1 序


图片名称 通过上一章对切片的介绍,相信大家已经对切片有了深刻了解,现在我们将介绍一种非常熟悉的数据结构:映射(map),类似与其他语言的字典和Hash表。

在Golang中,map是一个内建的引用类型,一种无序的键值对集合,类似类似于其他语言中的字典或哈希表。它允许我们使用键来存储和检索值。同时map提供了一种高效的方式来存储、组织和检索数据。map的键必须是唯一的,而值可以是任意类型:数字、字符串、布尔值、切片、映射或其他自定义类型,与数组和切片不同,map的大小是动态的,可以根据需要自动增长和收缩。

Map提供了一些常用的方法来操作键值对,如Get用于获取指定键的值,Set用于设置键值对,Delete用于删除键值对,以及Len用于获取map中的键值对数量。此外,还有一些有用的方法如Range可以遍历map中的所有键值对。

Map在Golang中广泛应用于各种场景,如数据存储、缓存、配置管理、日志记录等。由于其高效、灵活和易于使用的特性,map成为了Golang中不可或缺的数据结构之一。

2 Map特点

  • 无序、无重复
    • 存储无序、遍历无序
    • key不可重复
  • 动态长度
    • map长度可以动态增长或缩减
  • 查询快
    • 通过key查询快,正常情况O(1)的时间复杂度
    • 极端情况,hash极不均匀,时间复杂度退化为O(n)
  • 线程不安全
    • map本身不是线程安全的,高并发场景需要加锁
  • 内置、使用方便
    • 直接使用无需引入其他库

3 Map底层原理

Golang的map使用哈希表作为底层实现,一个哈希表里可以有多个哈希表节点,也即bucket,而每个bucket就保存了map中的一个或一组键值对。

3.1 核心数据结构

Map主要有两个核心结构,基础结构和桶结构:

  • hmap:Map的基础结构。
  • bmap:存放key-value的桶结构。严格来说hmap.buckets指向桶组成的数组,每个桶的头部是bmap,之后是8个key,再是8个value,最后是1个溢出桶指针,指向额外的桶链表,用于存储溢出的元素。

Map的数据结构定义于src/runtime/map.go中,首先我们看下相关常量、hmap的定义。

1
2
3
4
5
6
7
8
9
10
11
12
13
14
15
16
17
18
19
20
21
22
23
24
25
26
27
28
29
30
31
32
33
// A header for a Go map.
type hmap struct {
// Note: the format of the hmap is also encoded in cmd/compile/internal/reflectdata/reflect.go.
// Make sure this stays in sync with the compiler's definition.
count int // # live cells == size of map. Must be first (used by len() builtin)
flags uint8
B uint8 // log_2 of # of buckets (can hold up to loadFactor * 2^B items)
noverflow uint16 // approximate number of overflow buckets; see incrnoverflow for details
hash0 uint32 // hash seed

buckets unsafe.Pointer // array of 2^B Buckets. may be nil if count==0.
oldbuckets unsafe.Pointer // previous bucket array of half the size, non-nil only when growing
nevacuate uintptr // progress counter for evacuation (buckets less than this have been evacuated)

extra *mapextra // optional fields
}

// mapextra holds fields that are not present on all maps.
type mapextra struct {
// If both key and elem do not contain pointers and are inline, then we mark bucket
// type as containing no pointers. This avoids scanning such maps.
// However, bmap.overflow is a pointer. In order to keep overflow buckets
// alive, we store pointers to all overflow buckets in hmap.extra.overflow and hmap.extra.oldoverflow.
// overflow and oldoverflow are only used if key and elem do not contain pointers.
// overflow contains overflow buckets for hmap.buckets.
// oldoverflow contains overflow buckets for hmap.oldbuckets.
// The indirection allows to store a pointer to the slice in hiter.
overflow *[]*bmap
oldoverflow *[]*bmap

// nextOverflow holds a pointer to a free overflow bucket.
nextOverflow *bmap
}

hmap结构体字段说明:

1
2
3
4
5
6
7
8
9
10
11
count:元素的个数。len()函数返回的就是这个值
flags:状态标记位。如是否被多线程读写、迭代器在使用新桶、迭代器在使用旧桶等
B:桶指数,表示hash数组中桶数量为2^B(不包括溢出桶)。最大可存储元素数量为loadFactor * 2^B
noverflow:溢出桶的数量的近似值。详见函数incrnoverflow()
hash0:hash种子
buckets:指向2^B个桶组成的数组的指针。可能是nil如果count为0
oldbuckets:指向长度为新桶数组一半的旧桶数组,仅在增长时为非零
nevacuate:进度计数器,表示扩容后搬迁的进度(小于该数值的桶已迁移)
extra.overflow:保存溢出桶链表
extra.oldoverflow:保存旧溢出桶链表
extra.nextOverflow:下一个空闲溢出桶地址

再来看bmap的定义:

1
2
3
4
5
6
7
8
9
10
11
12
// A bucket for a Go map.
type bmap struct {
// tophash generally contains the top byte of the hash value
// for each key in this bucket. If tophash[0] < minTopHash,
// tophash[0] is a bucket evacuation state instead.
tophash [bucketCnt]uint8 //存储桶内8个key的hash值的高字节。tophash[0] < minTopHash表示桶处于扩容迁移状态。
// Followed by bucketCnt keys and then bucketCnt elems.
// NOTE: packing all the keys together and then all the elems together makes the
// code a bit more complicated than alternating key/elem/key/elem/... but it allows
// us to eliminate padding which would be needed for, e.g., map[int64]int8.
// Followed by an overflow pointer.
}

特别注意:实际分配内存时会申请一个更大的内存空间A,A的前8字节为bmap,后面依次跟8个key、8个 value、1个溢出指针。把所有的key排在一起和所有的 value排列在一起,而不是交替排列(key/elem/key/elem/…),这样可以填充空白字节,例如 map[int64]int8。map 的桶结构实际指的是内存空间A。

3.2 数据结构图

创建Map时,会初始化一个hmap结构体,同时分配一个足够大的内存空间A。其中A的前段用于hash数组,A的后段预留给溢出的桶。于是hmap.buckets指向hash数组,即A的首地址;hmap.extra.nextOverflow初始时指向内存A中的后段,即hash数组结尾的下一个桶,也即第1个预留的溢出桶。所以当hash冲突需要使用到新的溢出桶时,会优先使用上述预留的溢出桶。hmap.extra.nextOverflow依次往后偏移直到用完所有的溢出桶,才有可能会申请新的溢出桶空间。
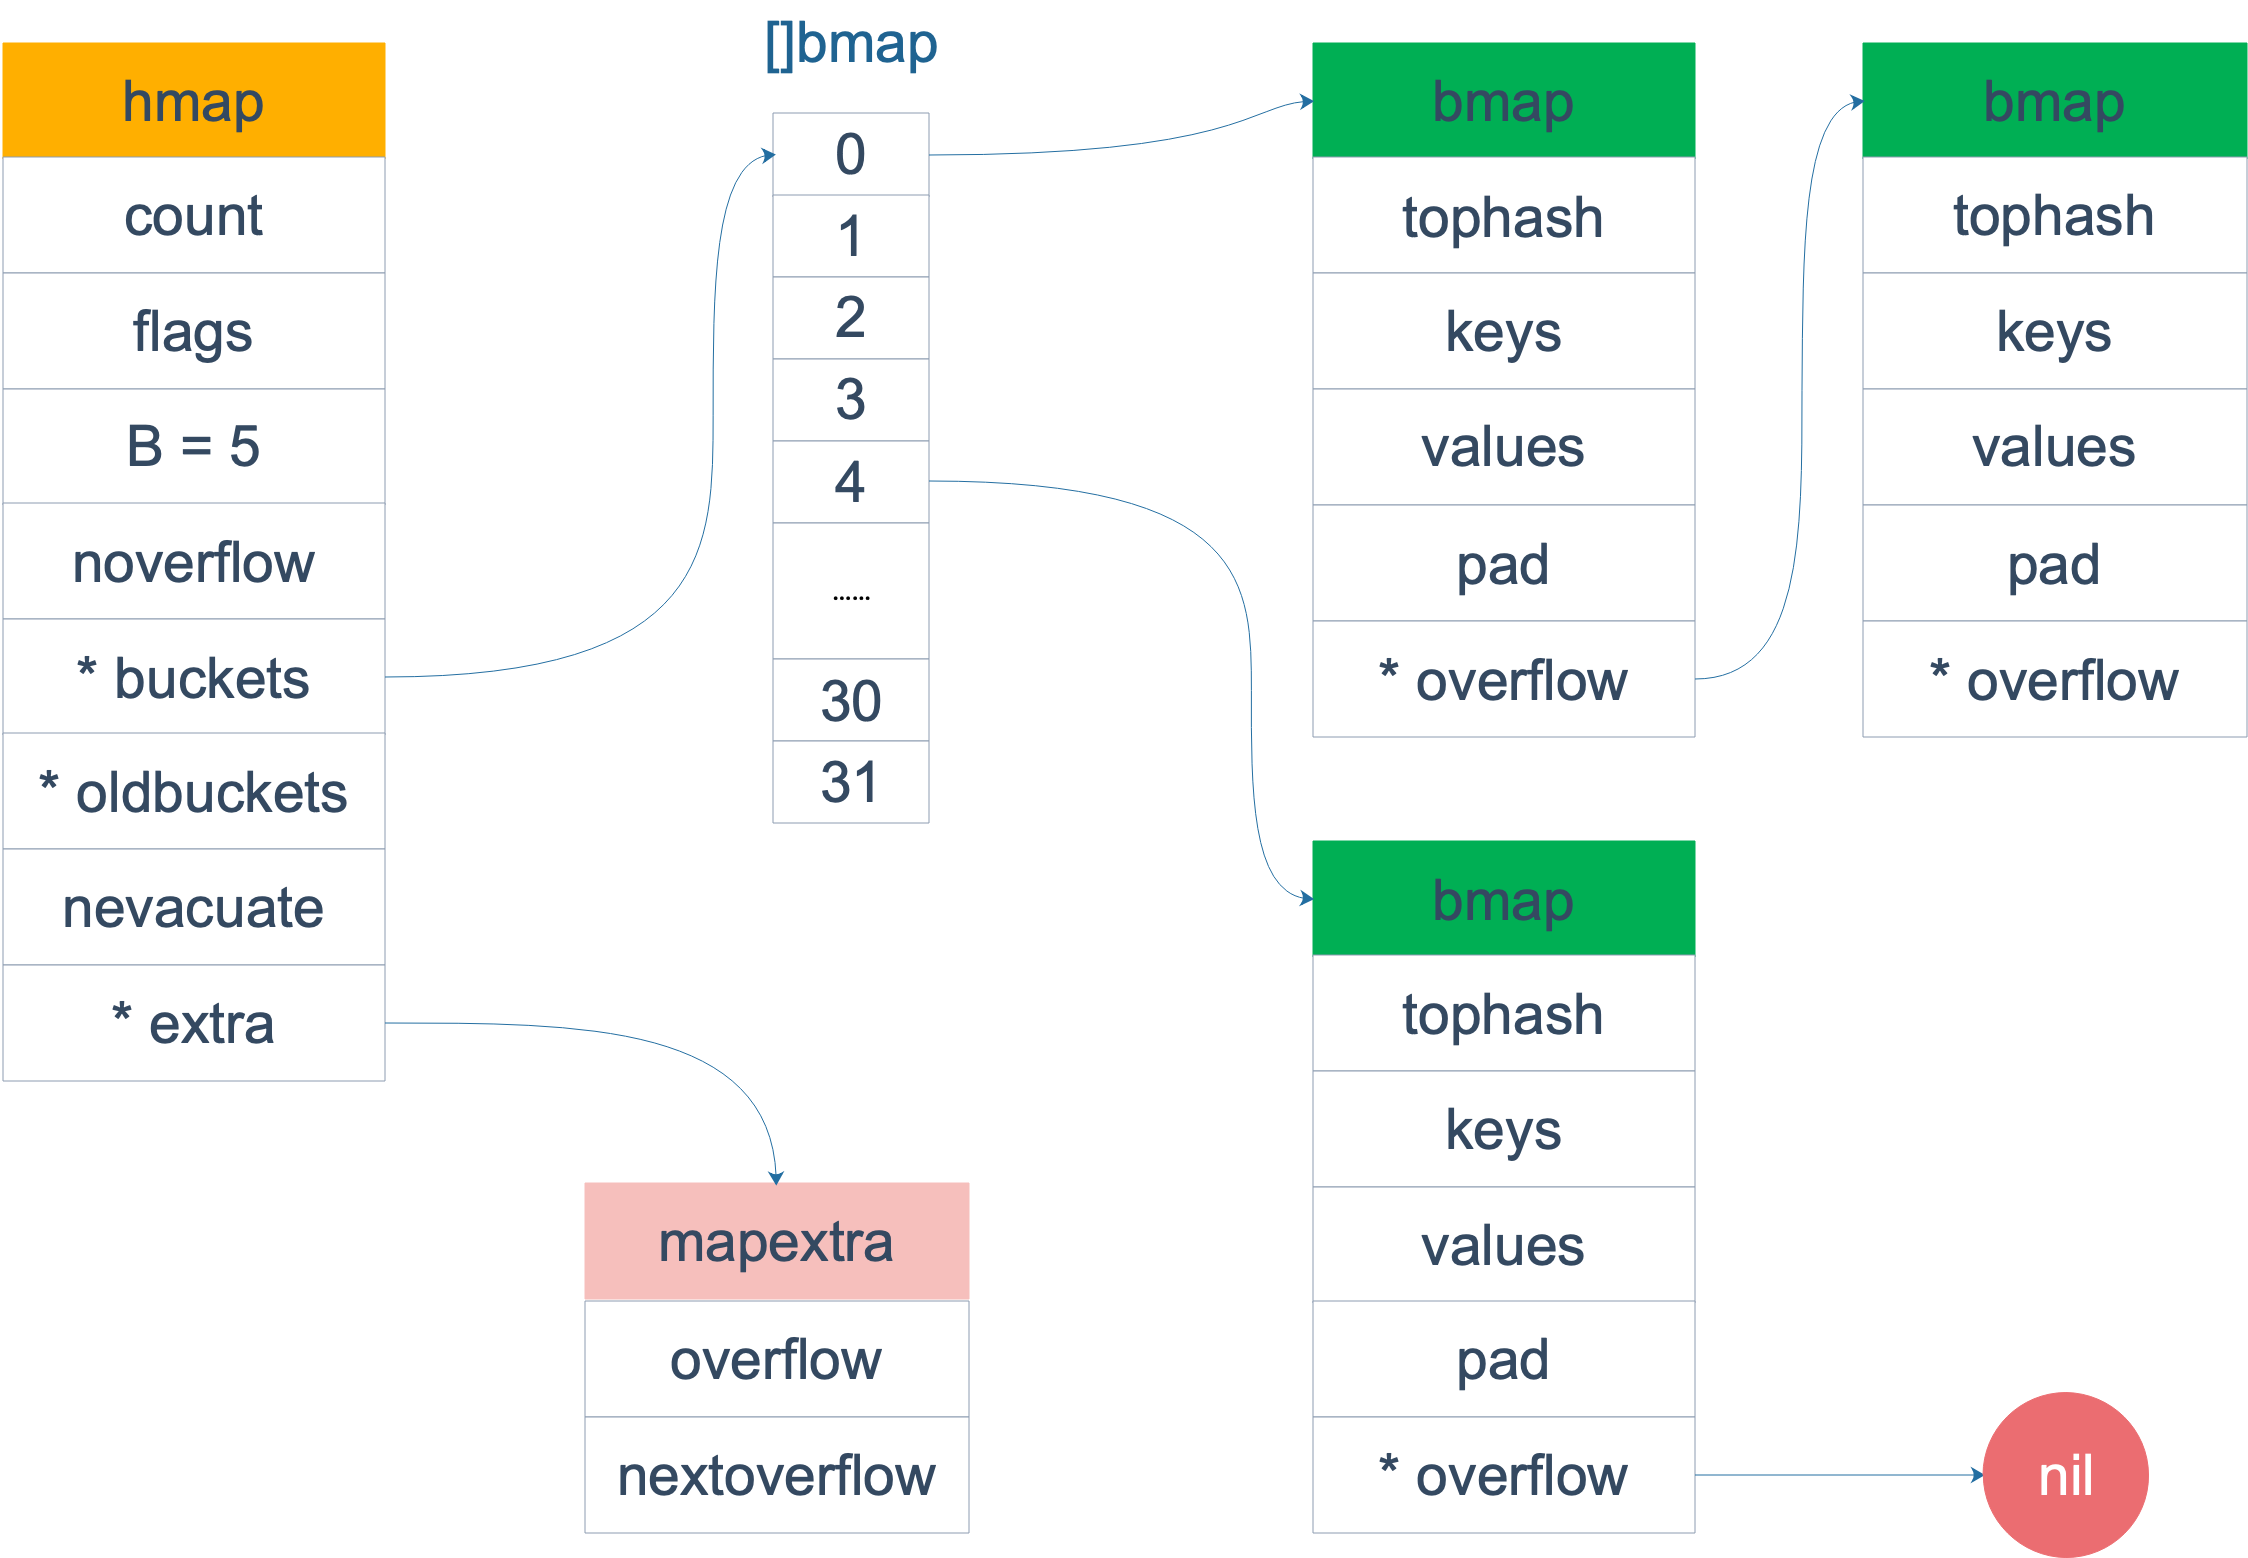
数据结构

4 定义Map

在Go中,映射的声明、定义和初始化是相对简单的操作。映射可以直接通过字面量声明、也可以使用make()函数创建。

在具体声明定义map之前,先思考一个问题,哪些数据类型可以用来做map的key呢?

4.1 key的数据类型

根据Golang编程规范一文中可以看到这么一句话:

1
2
The comparison operators == and != must be fully defined for operands of the key type; thus the key type must not be a function, map, or slice. 
If the key type is an interface type, these comparison operators must be defined for the dynamic key values; failure will cause a run-time panic.

根据原文意思,只有可比较的数据类型才能作为map的key,即能够通过==!=进行比较的类型可以做为map的key。

4.1.1 可比较的数据类型

  • 布尔值 可比较,如果两个布尔值都为真或者都为假则他们是相等的。
  • 整型 可比较且有序。
  • 浮点型 可比较。如果两个浮点型值一样 (由 IEEE-754 标准定义),则两者相等。
  • 复数型 可比较。如果两个复数型值的real()方法和imag()方法都相等,则两者相等。
  • 字符串 可比较。
  • 指针 可比较。如果两个指针指向相同的地址或者两者都为nil,则两者相等,但是指向不同的零大小变量的指针可能不相等。
  • 通道 可比较。如果两个通道是由同一个make创建的 (引用的是同一个channel指针),或者两者都为nil, 则两者相等。
  • 接口 可比较。interface的内部实现包含了2个字段,类型T和值V。如果两个接口具有相同的动态类型和动态值,或者两者都为nil, 则两者相等。
  • 结构体 如果两个结构体的所有字段都是可比较的,则结构体是是比较的。如果两个结构体对应的非空白字段相等,则两者相等
  • 数组 如果两个数组的所有元素都是可比较的则数组是可比较。如果两个数组的所有对应元素相等,则两者相等。

4.1.2 不可比较的数据类型

Golang中有3种数据类型不能比较,分别是slice、map、func,如果要比较这3种类型,使用reflect.DeepEqual函数。

具体参考:Golang编程规范-比较操作符

4.2 var关键字声明

在Golang中,可以使用var关键字来声明一个映射。映射的声明语法如下:

1
var mapName map[keyType]valueType

其中,mapName是映射的名称,keyType是映射中key的数据类型,valueType是映射中value的数据类型。

key可以是任意可以用 == 或者 != 操作符比较的类型,比如string、int、float。 所以数组、切片和结构体不能作为key (译者注:含有数组切片的结构体不能作为key,只包含内建类型的 struct是可以作为key的),但是指针和接口类型可以。如果要用结构体作为key可以提供Key()和Hash() 方法,这样可以通过结构体的域计算出唯一的数字或者字符串的key。 而valueType可以是任意类型。

例如,声明一个key是字符串类型,value是整数类型的映射:

1
var mapping [string]int

4.2.1 nil映射

nil映射被用在很多标准库和内置函数中,描述一个不存在的映射的时候,就需要用到nil映射。比如函数在发生异常的时候,返回的映射就是nil映射,或者声明了变量没有初始化的Map的值是nil。

1
2
3
4
5
6
7
8
import "fmt"

func main() {
var mapping map[string]int
// 尝试赋值
mapping["age"] = 20
// 尝试赋值编译不会报错,但是运行会报错:panic: assignment to entry in nil map
}

由此可见,如果只是声明了映射,不为它初始化值,则它只是一个nil映射,后续无法进行增加键值对。

4.3 使用字面量定义Map

我们可以通过var关键字和:=直接声明和初始化映射,例如:

1
2
3
4
5
6
7
8
9
10
11
12
import "fmt"

func main() {
// var关键字
var mapping1 = map[string]string{"name": "Ratel", "age": "20"}
fmt.Printf("Value=%s,Length=%d\n", mapping1, len(mapping1))
// Ouptput: Value=map[age:20 name:Ratel],Length=2

mapping2 := map[string]string{"name": "Ratel", "age": "20"}
fmt.Printf("Value=%s,Length=%d\n", mapping2, len(mapping2))
// Ouptput: Value=map[age:20 name:Ratel],Length=2
}

4.3.1 空Map

空映射一般会用来表示一个空的集合。比如数据库查询,一条结果也没有查到,那么就可以返回一个空映射。

1
2
3
4
5
6
7
8
9
import "fmt"

func main() {
var mapping = map[string]int{}
// 赋值
mapping["age"] = 20
fmt.Printf("Value=%v,Length=%d\n", mapping, len(mapping))
// Ouptput: Value=map[age:20],Length=1
}

4.3 通过make关键定义Map

我们知道Golang内置的make()函数可以实现创建切片、映射和通道,我们先看make()的方法签名:

1
2
3
4
5
6
7
8
9
10
11
12
13
14
15
16
17
18
19
// The make built-in function allocates and initializes an object of type
// slice, map, or chan (only). Like new, the first argument is a type, not a
// value. Unlike new, make's return type is the same as the type of its
// argument, not a pointer to it. The specification of the result depends on
// the type:
//
// Slice: The size specifies the length. The capacity of the slice is
// equal to its length. A second integer argument may be provided to
// specify a different capacity; it must be no smaller than the
// length. For example, make([]int, 0, 10) allocates an underlying array
// of size 10 and returns a slice of length 0 and capacity 10 that is
// backed by this underlying array.
// Map: An empty map is allocated with enough space to hold the
// specified number of elements. The size may be omitted, in which case
// a small starting size is allocated.
// Channel: The channel's buffer is initialized with the specified
// buffer capacity. If zero, or the size is omitted, the channel is
// unbuffered.
func make(t Type, size ...IntegerType) Type

通过make()函数不仅会声明映射变量,同时还会对它做初始化操作,在底层开辟好一定容量的空间方便后续做添加元素操作,它的大致格式如下:

1
2
3
4
5
// var关键字
var mapName = make(map[keyType]valueType, capacity)

// :=符号
mapName := make(map[keyType]valueType, capacity)

通过make()函数声明映射时,capacity参数可以不指定,如不指定时,其容量默认等于0,但是如果指定容量,那容量一定不能小于0,即0 <= capacity

1
2
3
4
5
6
7
8
9
10
11
12
13
import "fmt"

func main() {
// 不指定容量
var mapping1 = make(map[string]int)
fmt.Printf("Value=%v,Length=%d\n", mapping1, len(mapping1))
// Ouptput: Value=map[],Length=0

// 指定容量为5
var mapping2 = make(map[string]int, 5)
fmt.Printf("Value=%v,Length=%d\n", mapping2, len(mapping2))
// Ouptput: Value=map[],Length=0
}

通过以上例子可以看到,通过make()函数创建的映射,即使指定了容量,Map也是空的,其长度仍为0,因为映射中没有具体元素。只有当添加了键值对后,Map的长度才会相应增加。容量参数主要是为了提前分配底层数组的大小,以减少Map在容量不足时的重新分配,从而提高性能。

5 访问Map元素

由于Map是无序的,每次打印出来的map都会不一样,因此它不能通过index获取,而必须通过key获取。在Golang中,要从Map中查找一个特定的key,可以通过下面的代码来实现:

1
2
3
4
5
6
7
8
9
10
11
import "fmt"

func main() {
mapping := map[string]string{"name": "Ratel", "age": "20"}
value, ok := mapping["name"]
if ok {
fmt.Println("value: ", value) // Output: value: Ratel
} else {
fmt.Println("not found")
}
}

判断是否成功找到特定的key,不需要检查取到的值是否为零值,只需查看第二个返回值ok,如果ok为true,表示map中含有该key,否则不含有,看起来非常清晰易懂。

如果我们不用ok来判断,我们直接获取一个明显不存在的key, 会是怎么样的结果呢?

1
2
3
4
5
6
7
import "fmt"

func main() {
mapping := map[string]string{"name": "Ratel", "age": "20"}
value := mapping["address"]
fmt.Println("value: ", value) // Output: value:
}

通过以上示例我们发现,如果address不存在,则返回空字符串。

如果key值在映射中不存在,则map[key]返回的值就是valueType的零值。因此我们不能用value是否为空来判断key在映射中是否存在。

6 Map遍历

由于映射无序,所以不可能通过索引去取值,所以只能使用range关键字遍历。例如:

1
2
3
4
5
6
7
8
import "fmt"

func main() {
mapping := map[string]string{"name": "Ratel", "age": "20"}
for key, value := range mapping {
fmt.Printf("Key: %s, Value: %s\n", key, value)
}
}

如果不需要使用value,可以直接省略:

1
2
3
4
5
6
7
8
import "fmt"

func main() {
mapping := map[string]string{"name": "Ratel", "age": "20"}
for key := range mapping {
fmt.Println(key)
}
}

如果不需要使用key,可以通过下划线’_’代替:

1
2
3
4
5
6
7
8
import "fmt"

func main() {
mapping := map[string]string{"name": "Ratel", "age": "20"}
for _, value := range mapping {
fmt.Println(value)
}
}

注意: Map的迭代顺序是不确定的,并且不同的哈希函数实现可能导致不同的遍历顺序。在实践中,遍历的顺序是随机的,每一次遍历的顺序都不相同。 设计就是如此,每次都使用随机的遍历顺序可以强制要求程序不会依赖具体的哈希函数实现。如果要按顺序遍历key/value对,我们必须显式地对key进行排序,可以使用sort包的Strings函数对字符串slice进行排序。

1
2
3
4
5
6
7
8
9
10
11
12
13
14
15
16
17
18
import (
"fmt"
"sort"
)

func main() {
mapping := map[string]string{"name": "Ratel", "age": "20"}
// 声明一个切片保存map数据
var slice []string
// 将map数据遍历复制到切片中
for key := range mapping {
slice = append(slice, key)
}
// 对切片进行排序
sort.Strings(slice)
// 输出
fmt.Println(slice)
}

7 修改Map元素

由于映射无序,所以不可能通过索引修改值,可以key修改对应value值,具体语法为:mapping[key] = value,例如:

1
2
3
4
5
6
7
import "fmt"

func main() {
mapping := map[string]string{"name": "Ratel", "age": "20"}
mapping["name"] = "RatelWu"
fmt.Println(mapping) // Output: map[age:20 name:Ratel]
}

在这个示例中,mapping["name"] = "RatelWu"将映射mapping中key为name的value修改为RatelWu。

映射是引用类型,所以在函数中传递映射本身或者映射的指针都可以修改映射中的键值对,例如:

7.1 传递Map

1
2
3
4
5
6
7
8
9
10
11
12
13
14
15
import "fmt"

func main() {
mapping1 := map[string]string{"name": "Ratel", "age": "20"}
mapping2 := changeElement(mapping1, "name", "RatelWu") // 修改键值对
fmt.Printf("Value=%v,Length=%d\n", mapping1, len(mapping1)) // Output: Value=map[age:20 name:RatelWu],Length=2
fmt.Printf("Value=%v,Length=%d\n", mapping2, len(mapping2)) // Output: Value=map[age:20 name:RatelWu],Length=2
}


// 修改指定key的元素为value, 如果key不能在则会新增键值对
func changeElement(mapping map[string]string, key, value string) map[string]string {
mapping[key] = value
return mapping
}

7.2 传递Map指针

1
2
3
4
5
6
7
8
9
10
11
12
13
14
15
import "fmt"

func main() {
mapping1 := map[string]string{"name": "Ratel", "age": "20"}
mapping2 := changeElement(&mapping1, "name", "RatelWu") // 修改键值对
fmt.Printf("Value=%v,Length=%d\n", mapping1, len(mapping1)) // Output: Value=map[age:20 name:RatelWu],Length=2
fmt.Printf("Value=%v,Length=%d\n", mapping2, len(mapping2)) // Output: Value=map[age:20 name:RatelWu],Length=2
}


// 修改指定key的元素为value, 如果key不能在则会新增键值对
func changeElement(mapping *map[string]string, key, value string) map[string]string {
(*mapping)[key] = value
return *mapping
}

需要注意的是,当传递map的指针时,要确保map不为nil。在使用指针之前,通常需要先创建一个非空的map。如果map为nil,则对其进行解引用会导致运行时错误。

8 新增Map元素

新增映射键值对非常简单,语法和修改键值对一样,map[key] = value 即可实现添加元素,例如:

1
2
3
4
5
6
7
8
9
import "fmt"

func main() {
mapping := make(map[string]string)
mapping["name"] = "RatelWu"
mapping["age"] = "20"
fmt.Printf("Value=%v,Length=%d\n", mapping, len(mapping))
// Output: Value=map[age:20 name:RatelWu],Length=2
}

9 Map扩容机制

众所周知,我们使用Map的目的就是要根据目标key快速找到value,然而,随着向map中添加的key越来越多,key发生碰撞的概率也越来越大。bucket中的8个cell会被逐渐塞满,查找、插入、删除key的效率也会越来越低。最理想的情况是一个bucket只装一个key,这样,就能达到O(1)的效率,但这样空间消耗太大,用空间换时间的代价太高。

Go语言采用一个bucket里装载8个key,定位到某个bucket后,还需要再定位到具体的key,这实际上又用了时间换空间,当然这样做也要有一个度,不然所有的key都落在了同一个bucket里,直接退化成了链表,各种操作的效率直接降为O(n),这样做效率太低,对Map来说肯定是不行的。

所以为了平衡空间和时间,则有一个负载因子loadFactor, 源码中默认负载因子为6.5,Golang中Map的扩容缩容都是grow相关的函数来完成的。

1
2
3
4
5
6
7
8
9
10
11
12
13
14
15
16
17
18
19
20
21
22
23
24
25
26
27
28
29
30
31
32
33
34
35
36
37
38
39
40
// Like mapaccess, but allocates a slot for the key if it is not present in the map.
func mapassign(t *maptype, h *hmap, key unsafe.Pointer) unsafe.Pointer {
...
// If we hit the max load factor or we have too many overflow buckets,
// and we're not already in the middle of growing, start growing.
// 触发扩容时机的判断
if !h.growing() && (overLoadFactor(h.count+1, h.B) || tooManyOverflowBuckets(h.noverflow, h.B)) {
hashGrow(t, h)
goto again // Growing the table invalidates everything, so try again
}
...
}

// growing reports whether h is growing. The growth may be to the same size or bigger.
// 判断当前map是否在扩容, 如果oldbuckets不为空,说明老的buckects还有还元素没有搬迁完,也说明当前正在进行扩容操作。
func (h *hmap) growing() bool {
return h.oldbuckets != nil
}

// overLoadFactor reports whether count items placed in 1<<B buckets is over loadFactor.
// 负载因子超过6.5
func overLoadFactor(count int, B uint8) bool {
return count > bucketCnt && uintptr(count) > loadFactorNum*(bucketShift(B)/loadFactorDen)
}

// tooManyOverflowBuckets reports whether noverflow buckets is too many for a map with 1<<B buckets.
// Note that most of these overflow buckets must be in sparse use;
// if use was dense, then we'd have already triggered regular map growth.
// overflow buckets太多
func tooManyOverflowBuckets(noverflow uint16, B uint8) bool {
// If the threshold is too low, we do extraneous work.
// If the threshold is too high, maps that grow and shrink can hold on to lots of unused memory.
// "too many" means (approximately) as many overflow buckets as regular buckets.
// See incrnoverflow for more details.
if B > 15 {
B = 15
}
// The compiler doesn't see here that B < 16; mask B to generate shorter shift code.
return noverflow >= uint16(1)<<(B&15)
}

从赋值函数mapassign()可以看出,触发扩容有两个条件:

  • 当前不处在growing状态,即不在扩容状态;
  • 且两个(或)关系的条件;
    • 条件1:元素个数count大于hash桶数量(2^B)*6.5。注意这里的hash桶指的是hash数组中的桶,不包括溢出的桶;
    • 条件2:溢出的桶数量noverflow>=32768(1<<15)或者noverflow>=hash数组中桶数量。

对于命中条件1,2的限制,都会发生扩容。但是扩容的策略并不相同,毕竟两种条件应对的场景不同。

对于条件1,元素太多而bucket数量太少,这个很简单:直接将B加1,bucket最大数量(2^B)直接变成原来bucket数量的2倍。于是,就有新老bucket了。注意:这时候元素都在老bucket里,还没迁移到新的bucket来。而且新bucket只是最大数量变为原来最大数量(2^B)的2倍(2^B * 2)。

对于条件2,其实元素没那么多,但是overflow buckets数特别多,说明很多bucket都没装满。解决办法就是开辟一个新bucket空间,将老bucket中的元素移动到新 bucket,使得同一个bucket中的key排列地更紧密。这样原来在overflow bucket中的key可以移动到bucket中来。结果是节省空间,提高bucket利用率,map的查找和插入效率自然就会提升。

我们先看hashGrow()函数所做的工作,再来看具体的搬迁buckets是如何进行的。

1
2
3
4
5
6
7
8
9
10
11
12
13
14
15
16
17
18
19
20
21
22
23
24
25
26
27
28
29
30
31
32
33
34
35
36
37
38
39
40
41
42
43
44
45
46
47
48
49
50
func hashGrow(t *maptype, h *hmap) {
// If we've hit the load factor, get bigger.
// Otherwise, there are too many overflow buckets,
// so keep the same number of buckets and "grow" laterally.
// B+1 相当于是原来2倍的空间
bigger := uint8(1)
// 对应条件1
if !overLoadFactor(h.count+1, h.B) {
// 进行等量的内存扩容,所以B不变
bigger = 0
h.flags |= sameSizeGrow
}
// 将老buckets挂到buckets上
oldbuckets := h.buckets
// 申请新的buckets空间
newbuckets, nextOverflow := makeBucketArray(t, h.B+bigger, nil)

flags := h.flags &^ (iterator | oldIterator)
if h.flags&iterator != 0 {
flags |= oldIterator
}
// commit the grow (atomic wrt gc)
// 提交grow的动作
h.B += bigger
h.flags = flags
h.oldbuckets = oldbuckets
h.buckets = newbuckets
// 搬迁进度为0
h.nevacuate = 0
// overflow buckets数为0
h.noverflow = 0

if h.extra != nil && h.extra.overflow != nil {
// Promote current overflow buckets to the old generation.
if h.extra.oldoverflow != nil {
throw("oldoverflow is not nil")
}
h.extra.oldoverflow = h.extra.overflow
h.extra.overflow = nil
}

if nextOverflow != nil {
if h.extra == nil {
h.extra = new(mapextra)
}
h.extra.nextOverflow = nextOverflow
}
// the actual copying of the hash table data is done incrementally
// by growWork() and evacuate().
}

由于map扩容需要将原有的key/value重新搬迁到新的内存地址,如果有大量的key/value需要搬迁,会非常影响性能。因此map的扩容采取了一种称为“渐进式”地方式,原有的key并不会一次性搬迁完毕,每次最多只会搬迁2个bucket。

上面说的hashGrow()函数实际上并没有真正地“搬迁”,它只是分配好了新的buckets,并将老的buckets挂到了oldbuckets字段上。真正搬迁buckets的动作在growWork()函数中,而调用growWork()函数的动作是在mapassignmapdelete函数中。也就是插入或修改、删除key的时候,都会尝试进行搬迁buckets的工作。先检查 oldbuckets是否搬迁完毕,具体来说就是检查oldbuckets是否为nil。

扩容的预处理工作已经完成,接下来就是怎么把元素搬迁到新hash表里了。如果现在就一次全量搬迁过去,显然接下来会有比较长的一段时间map被占用(不支持并发)。所以搬迁的工作是增量搬迁的,这个从hashGrow()函数尾部的注释也可以看出。

1
2
3
4
5
6
7
8
9
10
11
12
func growWork(t *maptype, h *hmap, bucket uintptr) {
// make sure we evacuate the oldbucket corresponding
// to the bucket we're about to use
// 为了确认搬迁的bucket是我们正在使用的bucket。evacuate就是具体搬迁bucket的代码。
evacuate(t, h, bucket&h.oldbucketmask())

// evacuate one more oldbucket to make progress on growing
// 再搬迁一个bucket,以加快搬迁进程
if h.growing() {
evacuate(t, h, h.nevacuate)
}
}

bucket&h.oldbucketmask()这行代码,如源码注释里说的,是为了确认搬迁的bucket是我们正在使用的bucket。oldbucketmask()函数返回扩容前的map的 bucketmask。而bucketmask的作用就是将key计算出来的哈希值与bucketmask相与,得到的结果就是key应该落入的桶。比如B=5,那么bucketmask的低5位是11111,其余位是0,hash值与其相与的意思是,只有hash值的低5位决定key到底落入哪个bucket,evacuate()就是具体搬迁bucket的代码,大家可自行查看。

  • 每执行一次插入或删除,都会调用growWork()函数搬迁0~2个hash桶(有可能这次需要搬迁的2个桶在此之前都被搬过了);
  • 搬迁是以hash桶为单位的,包含对应的hash桶和这个桶的溢出链表;
  • 被delete掉的元素(emptyone标志)会被舍弃不进行搬迁。

需要注意的是,由于哈希表的特性,map在扩容过程中可能会导致元素的顺序发生变化。因此,在迭代map的过程中进行插入、删除等操作可能导致意外的结果。如果需要稳定的顺序,建议在迭代过程中不进行修改操作,或者重新构建一个新的map。

10 删除Map元素

从映射map中删除元素的语法为delete(map, key),让我们看下delete函数的方法签名。

1
2
3
4
// The delete built-in function deletes the element with the specified key
// (m[key]) from the map. If m is nil or there is no such element, delete
// is a no-op.
func delete(m map[Type]Type1, key Type)

通过函数介绍可知,delete方法用于删除map的键值对,入参为map和key且方法没有返回值,如果map映射为空或者map没有指定元素,则删除操作就相当于没执行。 例如:

1
2
3
4
5
6
7
8
9
10
11
import "fmt"

func main() {
mapping := map[string]string{"name": "Ratel", "age": "20"}
delete(mapping, "age")
fmt.Printf("Value=%v,Length=%d\n", mapping, len(mapping)) // Output: Value=map[name:Ratel],Length=1

// 如果key在mapping中不存在,则相当于没有执行该方法。
delete(mapping, "address")
fmt.Printf("Value=%v,Length=%d\n", mapping, len(mapping)) // Output: Value=map[name:Ratel],Length=1
}

11 清空Map元素

Golang中,我们可以通过内置的clear()函数进行Map的清空,具体语法为clear(map),我们来看看clear函数的方法签名。

1
2
3
4
5
6
7
8
// The clear built-in function clears maps and slices.
// For maps, clear deletes all entries, resulting in an empty map.
// For slices, clear sets all elements up to the length of the slice
// to the zero value of the respective element type. If the argument
// type is a type parameter, the type parameter's type set must
// contain only map or slice types, and clear performs the operation
// implied by the type argument.
func clear[T ~[]Type | ~map[Type]Type1](t T)

通过函数介绍可知,clear方法用于清空map的键值对或者清空切片元素,例如:

1
2
3
4
5
6
7
8
9
import "fmt"

func main() {
mapping := map[string]string{"name": "Ratel", "age": "20"}
fmt.Printf("Value=%v,Length=%d\n", mapping, len(mapping)) // Output: Value=map[name:Ratel],Length=1
// 清空map
clear(mapping)
fmt.Printf("Value=%v,Length=%d\n", mapping, len(mapping)) // Output: Value=map[name:Ratel],Length=1
}

12 Map复制

因为映射是引用类型,当你将一个映射赋值给另一个变量时,会复制对映射的引用,而不是复制整个映射的内容。

12.1 =复制

当我们使用=复制时,这是一种浅拷贝,这意味着两个不同的映射共享一个底层存储空间,那么对一个映射的修改就会影响到另一个映射,例如

1
2
3
4
5
6
7
8
9
10
11
import "fmt"

func main() {
mapping1 := map[string]string{"name": "Ratel", "age": "20"}
mapping2 := mapping1 // 复制mapping2到mapping1
mapping1["name"] = "RatelWu" // 修改mapping1的第一个元素
fmt.Printf("Value=%v,Pointer=%p, Length=%d\n", mapping1, &mapping1, len(mapping1))
// Output: Value=map[age:20 name:RatelWu],Pointer=0xc000042020, Length=2
fmt.Printf("Value=%v,Pointer=%p, Length=%d\n", mapping2, &mapping2, len(mapping2))
// Output: Value=map[age:20 name:RatelWu],Pointer=0xc000042028, Length=2
}

这个例子中,修改了mapping1的key=name对应value为RatelWu,mapping2的key=name对应的value也变成了RatelWu,因为在赋值时是将mapping1的引用复制给了mapping2,它们是共享同一个底层存储结构。所以当你修改mapping1中该元素值的时候,mapping2也跟着修改了。

12.2 自定义函数

在Go中,没有内置的函数来复制Map,如果想要拷贝一个Map,只有一种办法就是循环赋值,例如:

1
2
3
4
5
6
7
8
9
10
11
12
13
14
15
16
17
18
19
20
21
22
import "fmt"

func main() {
mapping1 := map[string]string{"name": "Ratel", "age": "20"}
mapping2 := deepCopy(mapping1)
mapping1["name"] = "RatelWu" // 修改mapping1的第一个元素

fmt.Printf("Value=%v,Pointer=%p, Length=%d\n", mapping1, &mapping1, len(mapping1))
// Output: Value=map[age:20 name:RatelWu],Pointer=0xc000042020, Length=2
fmt.Printf("Value=%v,Pointer=%p, Length=%d\n", mapping2, &mapping2, len(mapping2))
// Output: Value=map[age:20 name:Ratel],Pointer=0xc000042028, Length=2
}

// 深拷贝函数
func deepCopy(mapping map[string]string) map[string]string {
newmapping := make(map[string]string, len(mapping)) // 创建一个与mapping容量相同的空映射
// Copy from the original map to the target map
for key, value := range mapping {
newmapping[key] = value
}
return newmapping
}

通过以上示例可知,通过深拷贝复制的映射是相互独立的,底层各自拥有一片存储空间。

12 Map比较

在Go中,由于映射map是引用类型,所以不能直接使用==运算符进行比较,映射只有和nil比较才能使用 == 符号比较判断。例如:

1
2
3
4
5
6
7
import "fmt"

func main() {
mapping1 := map[string]string{"name": "Ratel", "age": "20"}
mapping2 := make(map[string]string)
mapping1 == mapping2 // invalid operation: mapping1 == mapping2 (map can only be compared to nil)
}

要比较两个映射是否相等,你需要逐个比较它们的元素。可以自定义函数循环来比较映射中的每个键值对,或者使用reflect.DeepEqual()函数进行比较。

12.1 自定义函数

1
2
3
4
5
6
7
8
9
10
11
12
13
14
15
16
17
18
19
20
21
22
23
24
import "fmt"

// 映射比较函数
func mappingEqual(mapping1, mapping2 map[string]string) bool {
if len(mapping1) != len(mapping2) {
return false
}
for key, value := range mapping1 {
if mapping2[key] != value {
return false
}
}
return true
}

func main() {
mapping1 := map[string]string{"name": "Ratel", "age": "20"}
mapping2 := make(map[string]string)
mapping2["name"] = "Ratel"
mapping2["age"] = "20"

result := mappingEqual(mapping1, mapping2)
fmt.Println("Mappings are equal:", result) // Output: Mappings are equal: true
}

12.2 reflect.DeepEqual()函数

reflect.DeepEqual()函数可以比较两个接口类型的值,包括映射。但请注意,这种方法有一些限制,不适用于所有类型的映射,且在性能上可能不如手动比较。

1
2
3
4
5
6
7
8
9
10
11
12
13
14
import (
"fmt"
"reflect"
)

func main() {
mapping1 := map[string]string{"name": "Ratel", "age": "20"}
mapping2 := make(map[string]string)
mapping2["name"] = "Ratel"
mapping2["age"] = "20"

result := reflect.DeepEqual(mapping1, mapping2)
fmt.Println("Mappings are equal:", result) // Output: Mappings are equal: true
}

12.3 注意事项

使用reflect.DeepEqual()函数比较两个map有以下一些注意事项:

  • 不可比较类型的限制:
    • 如果map中包含不可比较的类型,DeepEqual()可能无法正常工作,因为不可比较的类型不支持直接的深度比较。
    • 在map的值类型中使用不可比较的类型可能导致不准确的比较结果。
  • 不同类型的map:
    • 对于不同类型的map,DeepEqual()会返回false,即使它们的内容相同。
    • 比较map时,要确保它们的类型相同。
  • 顺序敏感性:
    • DeepEqual()会递归比较map中的元素,但不会关心元素的顺序。如果你需要对map中的元素的顺序敏感,可能需要手动遍历map进行比较。
  • 性能影响:
    • DeepEqual()在比较大型map或深层次嵌套的map时,可能会产生较高的性能开销。
    • 对于大型数据集,手动比较map中的元素可能更有效。

13 总结

经过这一章节,相信大家对映射Map已经比较了解,并知道针对map的常规操作以及它的底层原理,下一章节我们将继续Golang中的流程控制。